DIY Monogrammed Cutting Board
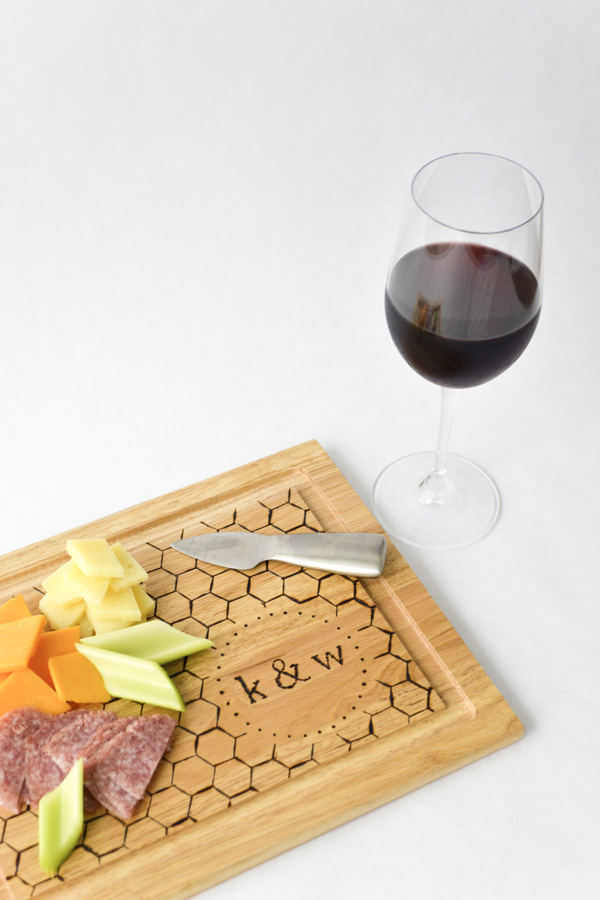
Custom cutting boards are the perfect host and hostess or newlywed gift. Today Annie of Anniemade is going to show us how to make a monogrammed cutting board. You can use any font or design you’d like with the help of transfer paper and a wood burning tool. Yes folks, time to dust off your wood burning project memories from school for this preppy chic gift!

Gifts for the kitchen are always a great choice for the bride and groom, and there’s nothing like a truly personalized gift. Today, we’re so happy to share with you how to take an ordinary registry item like a wood cutting board, and with just one inexpensive tool, turn it into a lifetime keepsake for the newlyweds!
Here’s what you need:
– Wood Cutting Board (ours come in a set of 3 from here)
– Wood Burning Pen with multiple nibs (ours from here; also sold at craft stores)
– Graphite Transfer Paper (used this one)
– Pencil with eraser
– Painter’s Tape
– Ruffled Cutting Board with Monogram Editable PDF Template (Download editable honeycomb monogram or Download editable monogram only for different size boards)

Using your template (you can download ours Download editable honeycomb monogram orDownload editable monogram only), print on a regular sheet of paper and trim according to the size of your cutting board. Tape the printed pattern and monogram sheet (facing upwards) to your cutting board with painter’s tape.


Slide a piece of graphite paper beneath, between the wood and the design, with the graphite (darker) side facing down and tape down the edges. This paper is essentially a giant colored pencil so as you press down, it will leave a trail of marks that are just as erasable as a pencil – perfect for tracing and transferring designs. Using your pencil, trace and press down firmly over each line and letter until you’ve gone over the entire paper. Once completed, remove both the graphite paper and the printed pattern.
You’ll see the design on the cutting board, ready to trace over with your wood-burning pen.

Time to trace the design with a wood burning tool. We used a multi-nibbed tool and used a flat angled nib for all the straight lines in this design. If using the same pen we used, allow it to pre-heat for 4-5 minutes and test the pen and different burning strokes on a scrap piece of wood to get used to it. When ready, carefully guide the pen over the wood, tracing over the graphite lines you created. The longer you hold the pen in place, the darker and bolder the line will be. The whole board took me about 20-30 minutes to do it but the straight lines were very easy to trace.

Erase the blue lines and wash your cutting board before using and you’re done!


View detailed step-by-step images
Check back next week for part II!
Project exclusively made for Ruffled. Anniemade is currently accepting bookings for custom wedding paper goods and projects.
Wonderful project. I recommend treating the board afterward with appropriate mineral oil or other food-safe products meant to treat cutting boards since the work on it may strip away the effect of previous treatment.
How did you create the honeycomb design? I like the idea of an all over pattern, but would prefer something else.
This is a great idea. Unfortunately, the editable monograms provided don’t work for letters that go below the base line, such as “p” or “j”. The bottoms of the letters get cut off.
Hi, this is really wonderful!!! I recreated it on the same cutting board that you used but I’m wondering if this will work just as easily on a hardwood cutting board rather than a bamboo cutting board? Do you have any thoughts?