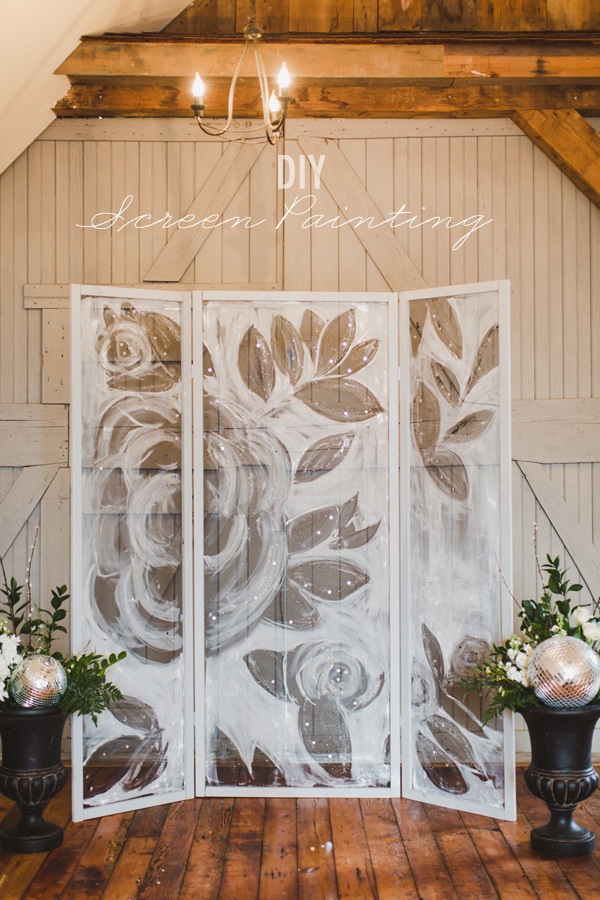
This DIY Screen Backdrop is Decor #GOALS

Imagine our faces when Lauren of Belovely Floral and Event Design told us the painting backdrop you may remember seeing in yesterday’s shoot was a DIY afterall. Not wallpaper nor fabric. So naturally, we’re giddy to share how she made it. Also captured by Pill Photography.

– Window screen roll in fiberglass (found at home improvement stores)
– 1×2 wood pieces (cut to your desired frame size)
– Corner L-shape brackets & 1/2″ screws
– 2 1/4″ screws
– Hinges (if you’re making a three frame standing backdrop)
– Scissors
– Acrylic Paint
– Glitter
– Staple Gun
– Minwax Water Based Polycrylic
– Foam Brushes
– Paint of your choice (we used Annie Sloan Chalk Paint in Paris Grey)
Instructions:
1. Have your 1×2 boards cut into the sizes you want for your frame
2. Screw on Corner L-Brackets to each corner creating your fame
3. Secure the corner with a 2 1/4″ screw from the side for extra support
4. Paint your frame to the color of your choice. Our final version we painted Paris Grey, however for this tutorial we left it natural – totally up to you!
5. Take your fiberglass screening and cut to the size of your frame.
6. Using your staple gun, staple the screen to the back of your frame, pulling it as taught as possible. Trim excess screen.
7. Using a foam brush, paint over the screen with a poly acrylic finish. This helps your paint appear thicker on the screen. The screens will not look different after this process and will still appear see-through. Let this dry.
8. Fun Begins! Paint on your design! We started with white craft paint and brushed on the design leaving dark black leaf and flower shapes. Using black and silver paint, we added swishes of shades to leaf shapes. Mixing glue and glitter to make a paint, swish on texture into the leaves and flowers. Hint: we designed our graphic on the computer first and then graphed out our screens to help transfer the design when we were painting, especially when your design spans over three screens.
9. Once your paint is dry add some extra sparkle and texture with glitter and mirrored squares.
10. To make a free standing backdrop, build and paint 3 frames and attach them together using hinge brackets.
Shoot Location: Philadelphia, PA / Photographer: Pill Photography / Event Design: Belovely Floral and Event Design / Venue: Stonebrook Farm / Wedding Dress: Watters “Farrah” / Makeup: True Beauty Marks / Wedding Cake: Addy Maes / Paper Goods: Papertree Studio / Calligraphy: Megan Fitch / Videographer: Between Sleep & Awake


I love this! I can’t wait to make my own rendition of it. Thanks for sharing. Looks like a lovely wedding, too. 🙂
What an amazing idea. I hope to try it out sometime during this wedding season.
Super cute! I would totally do this with a different design. But can’t paint for the life of me. Good thing I have friends who can ;P