Now Reading
DIY Geometric Wall Decor
DIY Geometric Wall Decor

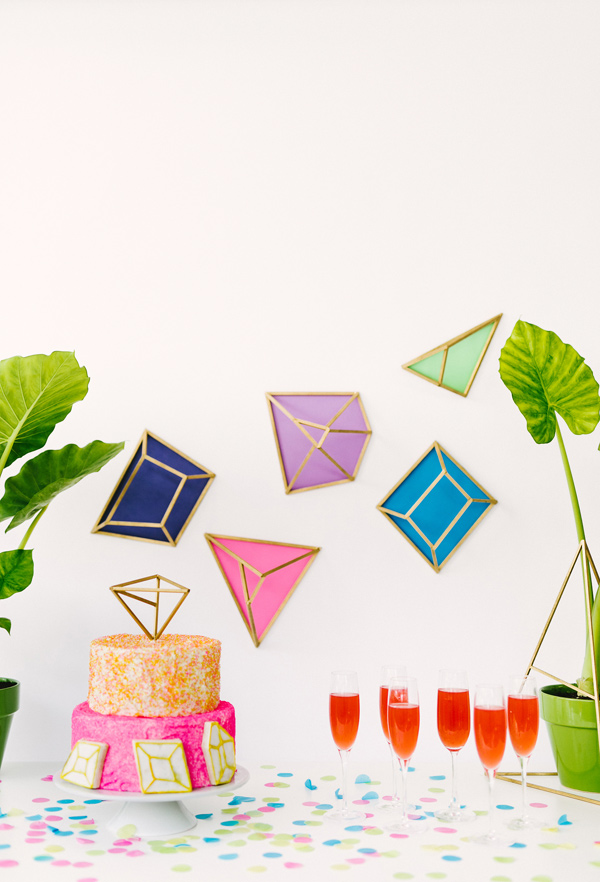
In the market for some high-impact, low-stress wall decor to make your party pop? Look no further, because we’ve got Kathryn Godwin of Studio Cultivate with us to share how to make these great geometric wall shapes that will add some quick pizzazz to your wall (or cake, or plants, or so much more) in seconds flat!

geometric wall decor - photo by Emily Chidester DIY by Studio Cultivate for Ruffled https://ruffledblog.com/diy-geometric-wall-decor

Ruffled - photo by Emily Chidester DIY by Studio Cultivate for Ruffled https://ruffledblog.com/diy-geometric-wall-decor

geometric planter - photo by Emily Chidester DIY by Studio Cultivate for Ruffled https://ruffledblog.com/diy-geometric-wall-decor

For this project, you will need:
-balsa wood 1/4″
-cardstock
-gold spray paint
-hot glue sticks
-hot glue gun
-miter cuter hand shear
-X-acto blade
-glue dots or double sided tape

DIY geometric wall decor - photo by Emily Chidester DIY by Studio Cultivate for Ruffled https://ruffledblog.com/diy-geometric-wall-decor

Instructions:
1. Measure out the lengths you want each geometric shape to be, using either an X-acto blade or the miter hand shear to cut at marked points.

DIY geometric wall decor - photo by Emily Chidester DIY by Studio Cultivate for Ruffled https://ruffledblog.com/diy-geometric-wall-decor

DIY geometric wall decor - photo by Emily Chidester DIY by Studio Cultivate for Ruffled https://ruffledblog.com/diy-geometric-wall-decor

2. If you don’t want to be exact with the angled cuts, the miter hand shear helps to estimate the proper cuts. As you work, align the pieces to be able to better decide on the angle to cut.

DIY geometric wall decor - photo by Emily Chidester DIY by Studio Cultivate for Ruffled https://ruffledblog.com/diy-geometric-wall-decor

3. Do the same with the 3-dimensional pieces that will project from the base, cutting after studying the desired angle, and trimming if necessary afterwards.

DIY geometric wall decor - photo by Emily Chidester DIY by Studio Cultivate for Ruffled https://ruffledblog.com/diy-geometric-wall-decor

4. With a dot of hot glue on each end, the pieces are easily assembled and quickly set. Hold in place while the glue cools.

DIY geometric wall decor - photo by Emily Chidester DIY by Studio Cultivate for Ruffled https://ruffledblog.com/diy-geometric-wall-decor

DIY geometric wall decor - photo by Emily Chidester DIY by Studio Cultivate for Ruffled https://ruffledblog.com/diy-geometric-wall-decor

5. Choose the preferred color of cardstock, apply hot glue to the base of balsa wood structure and press to the paper.

DIY geometric wall decor - photo by Emily Chidester DIY by Studio Cultivate for Ruffled https://ruffledblog.com/diy-geometric-wall-decor

See Also
couple portrait at Kona Beach

6. Gently cut around the edge of the balsa wood with an X-acto blade to cut away from paper sheet.

DIY geometric wall decor - photo by Emily Chidester DIY by Studio Cultivate for Ruffled https://ruffledblog.com/diy-geometric-wall-decor

DIY geometric wall decor - photo by Emily Chidester DIY by Studio Cultivate for Ruffled https://ruffledblog.com/diy-geometric-wall-decor

7. To temporarily adhere to wall, use glue dots or double sided tape and arrange in a clustered gathering.

DIY geometric wall shapes - photo by Emily Chidester DIY by Studio Cultivate for Ruffled https://ruffledblog.com/diy-geometric-wall-decor

DIY geometric wall decor - photo by Emily Chidester DIY by Studio Cultivate for Ruffled https://ruffledblog.com/diy-geometric-wall-decor

geometric cake decor - photo by Emily Chidester DIY by Studio Cultivate for Ruffled https://ruffledblog.com/diy-geometric-wall-decor

View step-by-step images for this tutorial in the gallery

Tips:
-Odd number quantities always make for a more dynamic composition!
-Make a variation without attaching to cardstock paper and use as a cake topper.
-Use larger pieces of balsa wood and create center pieces, we pulled a plant through one for an interesting take on table decor.

View Comments (3)
Scroll To Top