Our Kitchen Reno – The Before

Hi there! If you’re new here, we are renovating our 1910 house in Northern NJ little by little and this year we’re tackling two big renovations: the kitchen and a bathroom. When I am not sharing beautiful weddings, you can usually find me planning our next reno. We’re keeping its old house charm but adding function and style while sharing our journey along the way. Be sure to come back frequently for updates in the next several weeks! You can also follow the journey in my Insta Stories.
Some of you might remember our wood flooring journey in Insta Stories in November when we embarked on our largest renovation. We’re going to share our kitchen renovation process and since we’re doing most of it ourselves we’ll share tips and what we learned along the way! To get everything ready on time for the reveal in the coming weeks, to put things in perspective! After waiting for permits for almost 2 months, we got the green light from the town and moved full steam ahead last month. We’re tackling most of the kitchen ourselves, and I’ll be sharing the journey in the next 5 weeks.
Here’s what we’re working with…
The before –


What’s not working and things we’d like to change:
Overall this is functional kitchen with nothing overly offensive aesthetically speaking. It was updated probably sometime in the 90s, with vinyl peel-and-stick flooring and blonde maple cabinets that were painted white sometime before we bought the house.
There isn’t a whole lot of existing cabinetry so demo will be relatively easy, but the few cabinets that we do have are shallow and awkward.
The appliances are fairly newer and will find them a new home. Our current stove has had a series of issues, which we’ll be happy to replace with a new one.

Challenges
The kitchen has a very challenging layout, which has not changed since the house was built 110 years ago. Even though the kitchen is fairly small, the space could definitely be better utilized.
As much as we’d love to open up the kitchen into the dining room or expand it, we have a chimney preventing us from tearing the wall into the dining room, which used to be where the original wood-burning stove was. We can’t expand the kitchen because of the staircase on one side and the driveway facing the other, so we have to work with what we’ve got.
The kitchen has a butler’s pantry, with cabinetry that’s original to the house with a hidden built-in on the other side, which is located behind the chimney. It still has the original wavy glass and brass hardware, which we’re definitely keeping it. We will refinish the cabinets to either match the kitchen cabinets or paint in a complementing color.
The kitchen has a half bath in it. Right now the powder room opens into the side of the refrigerator. The bathroom is very small, around 3’x4’. The toilet faces the door, and with less than 3 feet clearance, a tall adult cannot sit on the toilet and shut the door 🙂
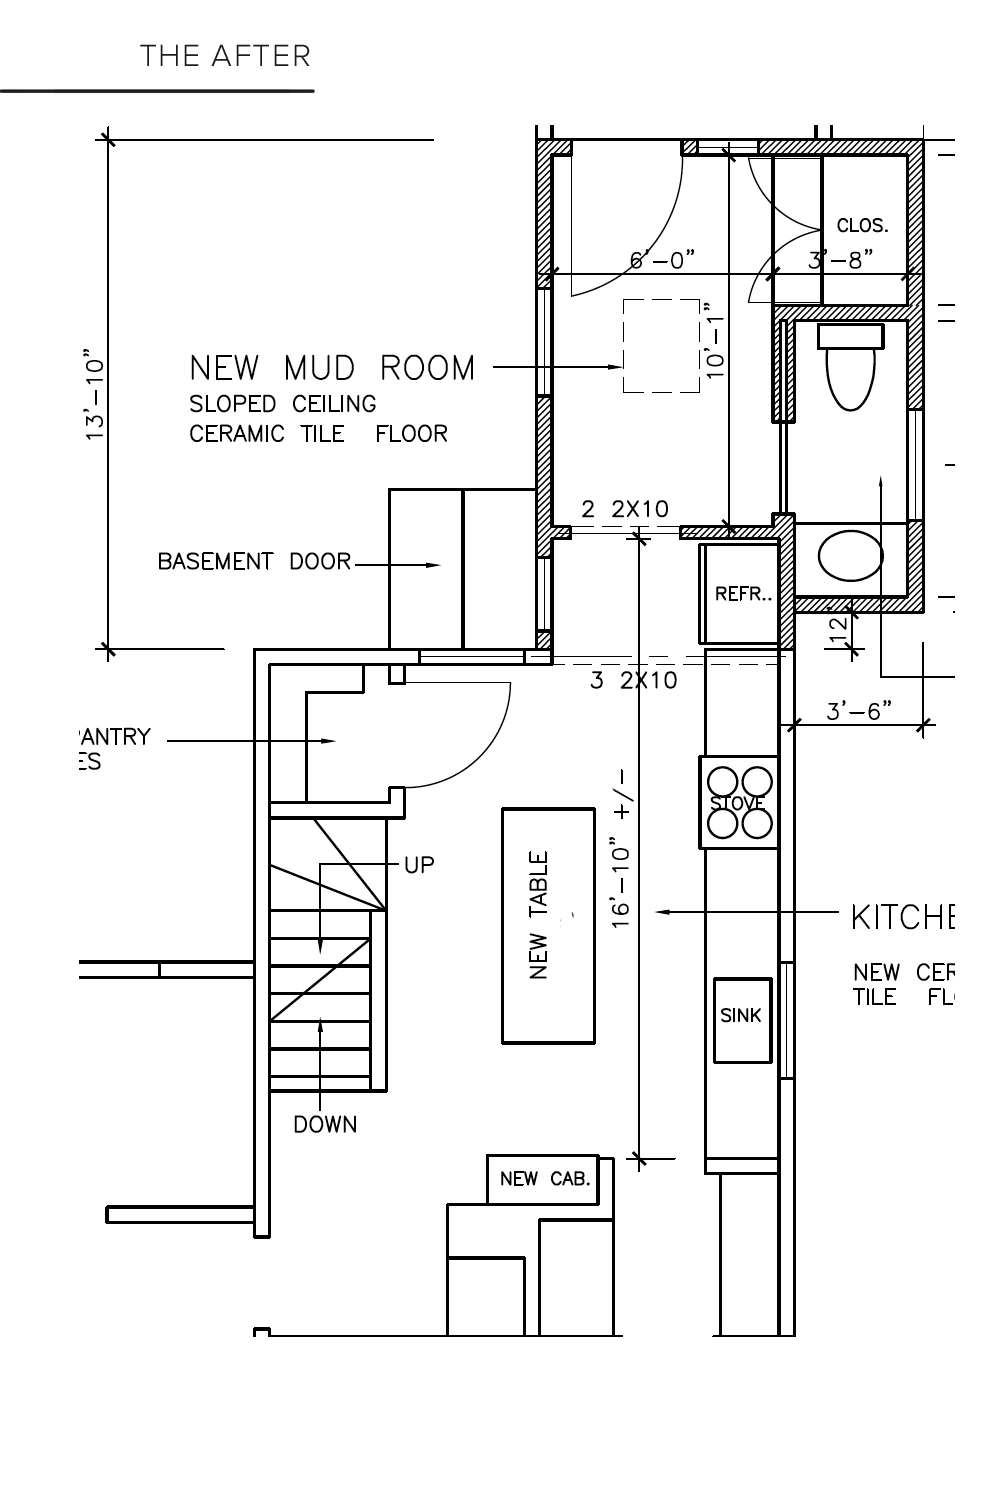
We will move the powder room out of the kitchen and into our new mudroom, which is something this house didn’t have before. We will demo the half bath to turn it into a walk in pantry with french doors and that will give us all of the hidden storage we currently don’t have for bulk food purchases and small appliances.

Seating
Our biggest challenge in renovating this kitchen was allocating space for seating at least 4. Our kitchen, like a true early 20th-century house, was built to be isolated to the rest of the house and out of the sight from guests, which makes rearranging or expanding the layout next to impossible. We find ourselves always in the kitchen, with some of us sitting on the steps of our staircase or on the floor with our kids most of the time, so making room for proper seating is at the top of our list.
We have a kitchen width of a smidgen over 10 feet, so having full size kitchen island or table is not an option. I searched the depths of the internet for a narrow, skinny freestanding island with seating and tucking stools under the table, but nothing quite looked right or had the right dimensions, so we will customize our own.


Counterspace

To maximize floor space, we’re moving the stove to the same wall as the sink. The downside is that the stove won’t have a clear focal moment with its own “view” since it will be in front of a freestanding island. Having the stove on the only wall we have for counterspace means sacrificing but that will give us a full wall to have floor to ceiling cabinets.
We’ve been debating whether to have a pantry or a cabinet base and uppers (or shelves) to create a bit more counterspace. We only have 15” to work for a cabinet depth, so we’re leaning towards a shallow pantry wall where we can fit a small microwave.
Preserving original architectural details
Another debate we’ve been having since we moved into our house is how to update the butler’s pantry and built in behind it into something that fits today’s lifestyle while honoring the original architectural details and keeping its charm.
The built-in is almost 3 feet deep with a narrow door, which is very hard to use. Should we install wall ovens in this space? Have a tall door and turn into a cleaning closet? Keep everything as is?
Our butler’s pantry is really the only storage we currently have, but the uppers are glass so everything is on display. The drawers, while functional could be larger to better utilize the space.
Inspiration: Clay Kitchen Cabinets


How do I remodel my kitchen?
While we wait on what it feels like 6 months for permits for our contractor to get started on the mudroom + half bath addition, we decided to tackle the kitchen ourselves in the meantime.
I’ve gone back and forth on what style cabinets to use for this kitchen, and ultimately ended up settling on inset kitchen cabinets since it matches the style of the house and the original cabinetry we have. I started to work with CliqStudios for my kitchen cabinets after ordering getting a few samples from them. They offer free samples, and the colors they offer were exactly what I was looking for.
How much did my cabinets cost?
Their quote for my cabinets were a bit less than other places with inset cabinets, and it was slightly more than going the IKEA route with custom overlay doors which was what we were originally considering. Inset kitchen cabinets are usually 30% more expensive than overlay because they’re more labor-intensive to build, but what brings that number even higher is because nearly all inset cabinets are custom order. So when I found out about Cliqstudios and their semi-custom inset cabinets I was immediately sold. They carry unique colors and you can order free samples to get a feel for the colors in person. Another thing that stood out for us was how fast our designer Nicole Vroman was to respond to my numerous emails, which was something that didn’t happen with any of their competitors offering the same inset style cabinetry, at much higher price ranges.
DIY Kitchen Renovation
Working with a professional kitchen designer is a must if you’re renovating your kitchen on your own. We had a challenging kitchen layout to work with and being able to talk and email with a designer opened up ideas and suggestions I wouldn’t have thought of!
They have kitchen designers as part of their free service, which helped us save a big chunk of our budget. Nicole Vroman, our designer, sketched our kitchen vision based off on some ideas and photos I shared and a rough mockup of what I looking for. She then developed the design and created the renderings and elevations.
We’ll be sharing a longer post on inset cabinets as we install ours, so stay tuned!
We’re expecting our third baby in July (!), so needless to say we’re nesting at a thousand miles per hour.
Check back next week for the moodboard and behind-the-scenes progress as we venture into renovating the kitchen ourselves!