DIY Embroidery Hoop Centerpieces
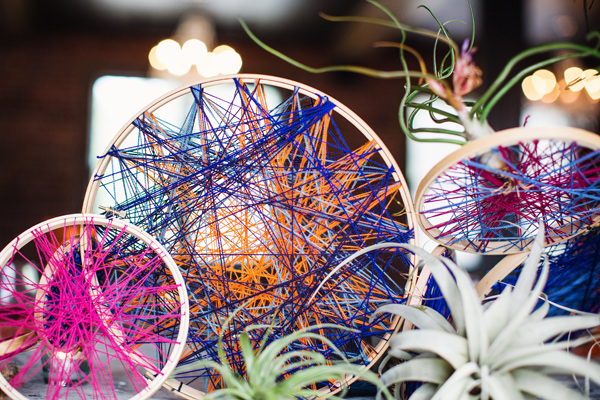
A DIY centerpiece that’s unexpected and also approachable for those with little to no artistic background? Sign me up now. Izzy Hudgins Photography and French Knot Studios are teaching us how to make the embroidery hoop centerpieces from today’s bohemian inspiration shoot — and as a bonus, they can also double as an eye-catching backdrop display!


For this project you will need:
-Embroidery hoops of varying sizes
-Multicolored yarn and embroidery floss (a great project to use up your stash)
-Scissors
-Floral wire
-Clear or double stick tape (optional)
Instructions:
1. Separate your embroidery hoop and set aside the outside circle (the one with the metal screw). Tie your first color around the hoop.

2. Wrap the yarn haphazardly around the circle. You may need a little clear tape here and there if your angles are too steep.


3. Keep going until you achieve a density of thread that is appealing to you. Then tie off the end.

4. Attach the next color and repeat the previous steps. Try to keep the first color centered around the middle, and the second closer to the edges.


5. After you’ve finished wrapping, slide the outer ring over the inner ring and tighten the screw as much as possible.
6. Trim the loose ends.

7. To build the centerpiece angle the hoops together and wire tightly where they meet. To stabilize the base, vary the angles from one hoop to the next.
8. Tuck airplants into threads and around the base.


Shoot Location: Savannah, GA / Photographer: Izzy Hudgins Photography / Event Design and Styling: French Knot Studios / Venue and Place Settings: Cohen’s Retreat / Dresses: James Gunn / Succulent Crown: Colonial House of Flowers / Hair and Makeup: Jessica Duthu / Menswear: Simon’s Formal Wear / Air Plants: Madame Chrysanthemum / Chocolate Egg Place Cards: Chocolat by Adam Turoni
The colors chosen for this are perfect and it works really well in the table centerpiece. It could easily be turned into dreamcatchers as well.